Tips for 3d Printing ABS & PolyCarbonate
In this article we discuss how to control warping on the Creatbot F series 3d printers like F430 & F160 when printing materials that shrink heavily.
ABS, ASA, PolyCarbonate, PolyPropylene, & Nylon 12 all tend to shrink & warp.
Here are some general steps to minimise the impact of this problem, & to get the best 3d prints:
1) Ensure the bed is set to at least 95C.
2) The first layer should be printed quite slow, around 15mms (so whatever your print speed for the rest of the part, the base should be slow).
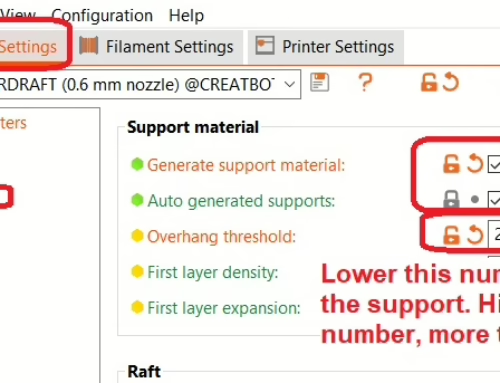
3) For large parts, use a brim at least 5mm wide, as part of the platform adhesion options.
4) Ensure that the chamber is heated to 55C, but not much more than that otherwise the filament will get soft before being extruded.
5) Ensure the part cooling fan is completely off & stays off throughout the print. You can turn the fan on a slow speed (20%) only when you are sure it will help you, which is rarely needed for ABS PC.
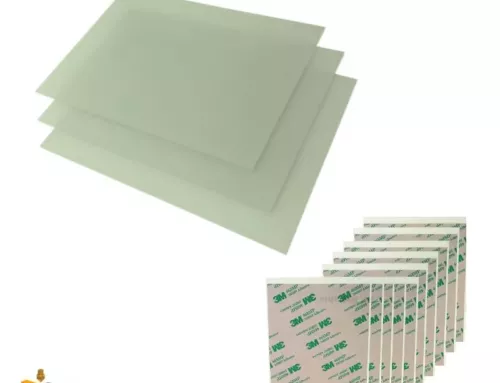
6) Use a glue stick, the supplied Deli brand is very good. You can put the glue even if you have got a PEI sheet stuck on the bed.
If you don’t have a PEI sheet, we highly recommend buying one & putting it on your bed.
Ensure the roll is free of moisture. Dry the roll in a normal oven at 60C for at least 6hrs before printing. This applies even to fresh rolls out of the package.
Vacuum packaged rolls can still absorb moisture as part of the filament extrusion process, so drying is really important particularly for all Nylons as they are hygroscopic.
Lets start with a 0.4mm nozzle printing with 0.2mm layer height at 40 mms print speed.
Keep the hot end temps for Standard ABS will be around 240C, ASA & PC around 260C, Nylon 6 grades at 250C, & Nylon 12 grades are usually around 280C.
Temps are not a fixed number, they are based on the Throughput / Flow rate you are demanding from the printer.
So the faster the speed, the more material being pushed out, the greater the heat required.
The larger the nozzle, the more the material being pushed out too, so again, you need more heat.
And similarly, the thicker the layer, the higher the material being pushed out too, so increase the temp accordingly.
The base layers should feel like they’re sticking in quite nicely if you touch them.
They must not come off easily when touched.
They must also not be digging into the bed or PEI sheet or looking very faint.
Do you feel the nozzle is a bit too far from the bed when the first layers get drawn down?
The nozzle might be a bit further away than ideal.
You can bring the nozzle closer, by increasing the Z Offset very slowly.
Go into Auto Level settings, & open the Z offset number.
Increase by only 0.1mm at a time, not more else you can damage things.
If you feel the nozzle is infact too close to the bed & thus the base layer doesn’t look like its properly being laid out, then please reduce the Z offset. Again, only 0.1mm at a time.
Check the infill, the higher the infill, the more the warping. Start at 10% & increase if needed.
For large parts, warping may still happen for large parts simply because of the difficult nature of PC.
A good solution in such cases is to try Carbon Fiber Reinforced ABS or Kevlar reinforced ABS – both print with almost no warping & are stronger, lighter, & handle higher temperatures.
With the F430 & F160 PEEK edition 3d printers, the heated chamber is your main advantage when used correctly.
And if you are printing large, flat, dense parts in these materials, then the PEEK300 3d printer is the correct choice.
To 3d print large PC without warping, we recommend the PEEK-300 3D Printer which has an insulated chamber heating up to 120C & & a water cooled extruder that stops the filament overheating before it enters the hot end.